Wednesday, March 9, 2011

Tip #95: Importing Tests

Tip: Tests can be imported from previous tests created in Blackboard.

Importing Tests from a Previous Course

Part 1: How to Export a Test
  1. Under the Control Panel, click Course Tools and then Test, Surveys, and Pools.
  2. Click Tests to retrieve a list of tests in your course.
  3. Click the down arrows next to the test you want to export.
  4. Click Export. A .zip file will download to your computer.
Part 2: How to Import a Test from a Previous Course
Note
: The original test must be exported using the directions above.
  1. Under the Control Panel, click Course Tools and then Test, Surveys, and Pools.
  2. Click Tests and then Import Test.
  3. On the Test Import page, click Browse My Computer to locate the .zip file.
  4. Click Submit.
  5. Once you receive a message that the test has been imported, click OK and you will be returned to your updated list of tests.
Note: If the test contains a random block from pools, then you will also need to export and import that pool.

Test questions may also be created in Word and uploaded using a Test Generator. Click the following link for directions: http://www.twu.edu/downloads/blackboard/BB9-1_Test_Generator.pdf.

Wednesday, March 2, 2011

Tip #94: Collecting Discussion Board Posts

Tip: A feature in Blackboard allows instructors and students to pull up a one-page view of all discussion board posts.

This feature can be used for printing posts or viewing all posts on one page.

Collecting Posts

  1. From the course menu, click Discussion Board.
  2. Click a discussion board forum.
  3. Select all posts by clicking the box next to Date. Click Collect, next to Thread Actions.
  4. All posts, including replies, will open on one page. Scroll down to read all posts.

Sorting and Marking Collected Posts

  • Scroll over the box next to Sort by to view and select an option for sorting posts. Posts can be sorted by Author’s Last Name, Author’s First Name, Subject, Date of Last Post, and Thread Order.
    Note: When sorting by name you may receive an error messaging stating that not all names could be detected and some posts may appear out of order. This message usually occurs when an anonymous post is included.

  • Posts can be marked as read or unread by clicking Mark, found underneath Sort by. To mark posts as read or unread, select posts by selecting individual boxes next to posts or by clicking All. Click Read or Unread from the Mark menu. Posts can also be marked by clicking the Mark as Unread or Mark as Read button in the bottom right corner of each post.

Wednesday, February 23, 2011

Tip #93: Recommendations for Deploying Tests


Tip: There are many options when a test is deployed in Blackboard. Following are recommendations for and explanations of test settings options.

Check out the Instructor Tips for Testing and Student Tips for Testing for more recommendations.

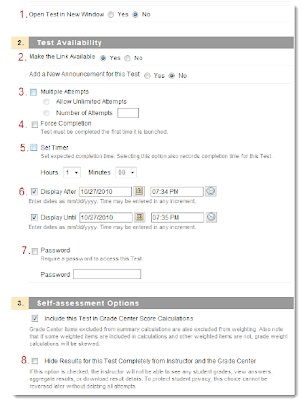
Deploying a Test (Test Options)

  1. Open Test in New Window: No. Popup blockers may prevent students from being able to even open tests that open in new windows.
  2. Make Link available: Yes
  3. Multiple Attempts can be beneficial for students, but is not necessary. You can select to allow multiple attempts or restrict to a set number of attempts to allow for possible issues.
  4. Do not check Force Completion. Students are only “locked out” of tests when Force Completion is set. We recommend setting a timer instead.
  5. Set timer allows the instructor to see how long a student spent on a test, regardless of how many times they closed their browser, had a connection time out, or were boosted by their Internet service provider. Since force completion is off, the student can reenter the test. The test timer continues to record time even if the student has exited the attempt.
  6. If setting release dates and times for a test, you must select both Display After and Display Until.
  7. Passwords for tests are especially useful when testing students in groups (eg: class of 120, testing 30 at a time in a proctored setting). Passwords should be changed after each group is tested.
  8. Do not check Hide Results for this Test Completely from Instructor and the Grade Center. This setting will not allow the instructor to ever see the scores on a test and should not be used for a test that needs to be graded.

Note: When deploying a test, do not use Adaptive Release to set date and time restrictions for the test. Instead, use the Display After/Display Until feature on the test options.

Wednesday, February 9, 2011

Tip #92: Announcing the Blackboard Innovative Teaching Series (BITS)

Tip: The Blackboard Innovative Teaching Series, offered through Blackboard Corporate, aims to help faculty adopt pedagogy that harnesses technology to improve learning outcomes and educator efficiency.

These four, 30-minute “snack-sized” webinars will be taught by faculty from higher ed institutions across the US and supported by Blackboard corporate experts.

Sessions include:

  • Strategies to Engage Student, February 22, 1-1:30 CST
  • Ten Ideas to Help Students be More Engaged in Online Classes, March 1, 1-1:30 CST
  • Assessing Student Engagement for Continuous Course Improvement, March 8,
    1-1:30 CST
  • Efficient Collaboration and Team Building in the Distance Learning Environment, 1-1:30 CST

This is a valuable learning experience for even the most seasoned instructor or designer.

To learn more about these sessions or to register, visit http://bb.syncslate.com/ and http://us.meeting-stream.com/blackboardinc_bitsseries/.

Wednesday, January 26, 2011

Tip #91: Adding Images and Files to Discussion Boards

Tip: Instructors and students should follow these specific guidelines to upload and view attachments in discussion boards due to a current issue affecting discussion board attachments.

Please share the student directions with your classes to ensure that student submissions are viewable.

INSTRUCTORS: Attach a file to a discussion board post.
  1. In a new post, make sure the Visual Editor in the upper right corner of the message box is On.
  2. Select the Attach File icon on the bottom of the message box toolbar.
  3. Select Browse My Computer to retrieve the file or image to attach.

STUDENTS: Attach a file to a discussion board post.
Note: Students should not embed images directly into a post.
  1. In a new discussion board post, type message.
  2. Underneath Attachments, next to Attach File, select Browse My Computer.
  3. A new window will open with files available to attach.
  4. Click Submit to attach the file.
Note: Instructors may need to enable Attach File for students.

INSTRUCTORS: To enable Attach File on discussion boards for students:
  1. Under Control Panel, select Course Tools and Discussion Board.
  2. Click on discussion board that contains the forum to edit.
  3. Click the dropdown menu next to the forum name and select Edit.
  4. Scroll to the bottom of the page to find Forum Settings and select Allow File Attachments if the option is not checked.
  5. Click Submit.

Wednesday, January 19, 2011

Tip #90: Enrolling and Removing Students from a Course

Tip: You can enroll students, remove students, and limit a dropped student’s access
  • NOTE: Official university student rosters can be obtained from WebAdvisor and compared with Blackboard rosters.
Enrolling a student:
You can enroll students who are on the official university student rosters but not on the Blackboard roster.
  1. Access your course
  2. Click on the Users and Groups area of the Control Panel and select Users
  3. Click on Enroll Users
  4. On the Add Enrollments page, enter the student’s username and click on Submit
Removing students from a course:You can remove students who are not enrolled in the course per your WebAdvisor roster. Keep in mind that all student data will be removed including grades, assignment submissions, and course statistics. If a student has dropped the course, consider limiting their access so that you may retain their student data.
  1. Access your course
  2. Click on the Users and Groups area of the Control Panel and select Users
  3. Select the students you would like to remove from your course
  4. Click on Remove Users from Course
Limiting a student’s access and retaining student information:If a student has dropped the course, you can limit their access to the course while retaining all student data, including grades, for that student.
  1. Access your course
  2. Click on the Users and Groups area of the Control Panel and select Users
  3. Click on the action link next to the student’s username and select Change User’s Availability in Course
  4. Select No from the dropdown next to Available (this course only)
  5. Click on Submit

Wednesday, January 12, 2011

Tip #89: Beginning of Semester Checklist

Tip: Beginning of semester tasks

  1. Enhance course design and menu options
  2. Customize course entry by setting a new course entry point (e.g. Announcements, Discussions, Groups, Tools)
  3. Combine multiple course sections into one shell (if applicable)
  4. Make the course available

Enhance the course design and menu options:

  1. Access your course
  2. On the Control Panel, click on Customization and then select Style where you can:
    • choose a course menu style
    • manage how the menu is displayed
    • add/change the course banner
  3. On the Course Menu, you can:
    • re-arrange the order of menu items by clicking on the double-headed arrow to the left of the menu item then dragging and dropping the item to its new position on the Course Menu
    • rename, show/hide, or delete a menu item by clicking on the action link next to the item
    • add a content area, a link to a course tool, a link to a course area, or an external link to the course menu by clicking on the Add symbol on the Course Menu

Customize course entry by setting a new course entry point (e.g. Announcements, Discussions, Groups, Tools):

  1. Access your course
  2. On the Control Panel, click on Customization and then select Style
  3. Scroll down to the Select Course Entry Point section and select your entry point form the dropdown
  4. Click on Submit
Combine multiple course sections into one shell (if applicable):
  1. Access the course from which you want to move users
  2. On the Control Panel, click on Packages and Utilities and then select Course Copy
  3. Select Copy Course Materials into an Existing Course from the Select Copy Options dropdown
  4. Click on Browse and, in the pop-up window that appears, select the Destination Course then click on the Submit button in the lower right-hand corner of the pop-up window
    • NOTE: The Destination Course is the course to which the enrollments will be copied
  5. Place a checkmark next to Tasks
  6. Place a checkmark next to Include Enrollments in the Copy
  7. Click Submit
    • NOTE: You will receive an email notification when the enrollments copy is complete

Make the course available:

  1. Access the course you want to make available
  2. On the Control Panel, click on Customization and then select Properties
  3. Under Set Availability, select Yes to Make Course Available
  4. Click Submit